If you want to change the information of the stirrups in longitudinal view, select the menu “Lay-out” – “Comments” – “Stirrups…“. The following dialog box now appears on the screen:
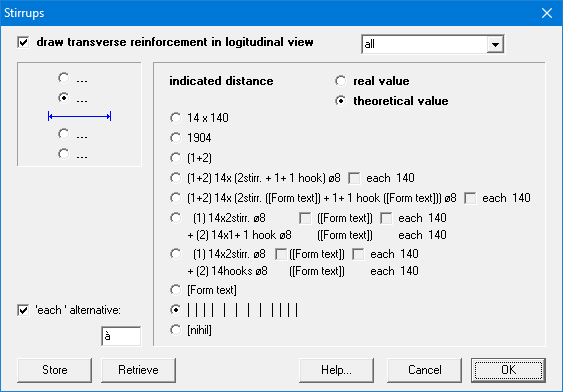
- With
 , you can indicate if the stirrups should be drawn in the longitudinal view.
 - With
 , you can indicate how many stirrups should be drawn per zone. You can choose between:
- drawing all stirrups
- drawing 1 stirrup per zone (in the middle of the zone)
- drawing 2 stirrups per zone (one at the beginning and one at the end of each zone) drawing 3 stirrups per zone (one at the beginning, one in the middle and one at the end of each zone)
- Using the four radio buttons
 you can select the line to which you want to give information.
- The theoretical distance is the distance between the stirrups as it was calculated by ConCrete, in other words: without taking into account whether the total distance is a multiple of the distances.
The real distance is the distance is obtained by dividing the length along which the theoretical distance is valid, by the number of stirrups. - The different possibilities for this information are indicated on the right. You change the information on the indicated line by selecting another radio button. For the explanation of “[Form text]” see this article.
With the last but one radio button we can let the program draw vertical lines on the desired line, at the place of the horizontal position of the stirrups.
- The theoretical distance is the distance between the stirrups as it was calculated by ConCrete, in other words: without taking into account whether the total distance is a multiple of the distances.
In the edit field at the left bottom side, we can enter an alternative for “each”.
With the button “Store” you can save the current input as default. With the button “Retrieve” you can replace the current content of the dialog with the default values. –
Om de informatie bij de beugels in het langsaanzicht te veranderen ga naar het menu “Layout” –”Tekst & uitleg” – “Beugels…“. Op het scherm verschijnt onderstaand dialoogvenster:
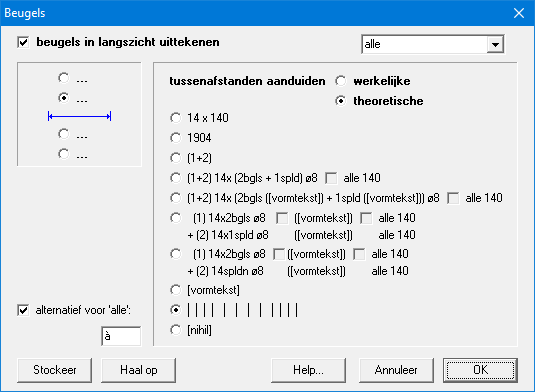
- De optie
 laat toe de beugels al dan niet uit te tekenen in het langsaanzicht.
 - D.m.v. het pulldown-menu
 kan u aangeven hoeveel beugels er per beugelzone dienen getekend te worden. U hebt de keuze tussen:
- alle beugels tekenen
- 1 per zone (in het midden van de zone)
- 2 per zone (één aan het begin, één aan het einde van de zone)
- 3 per zone (één aan het begin, één aan het einde en één in het midden)
- Links kan u met behulp van vier keuzeknoppen aanduiden op welke lijn (t.o.v. de bematingslijn) welke informatie moet getoond worden.
- De theoretische tussenafstand is de afstand tussen de beugels zoals die werd berekend door ConCrete, dus zonder rekening te houden of de totale afstand wel een veelvoud is van de tussenafstanden.
De werkelijke tussenafstand is de afstand die bekomen wordt door de lengte waarover de theoretische tussenafstand geldig is, te delen door het aantal beugels. - De verschillende mogelijkheden voor deze informatie worden opgelijst aan de rechter kant. Zie §4.6 voor de verklaring van “[vormtekst]”.
Door van keuzeknop te veranderen, wijzigt de informatie op de aangeduide lijn. Met de voorlaatste optie kunnen op de gewenste lijn verticale lijnen getekend worden ter plaatse van de horizontale positie van de beugels.
- De theoretische tussenafstand is de afstand tussen de beugels zoals die werd berekend door ConCrete, dus zonder rekening te houden of de totale afstand wel een veelvoud is van de tussenafstanden.
- In het invulveld linksonder kan een alternatief ingevuld worden voor “alle”.
De betekenis van de knoppen “OK“, “Stockeer”, “Haal op” en “Annuleer” is analoog aan deze in ConCrete.
- Actuele instellingen worden bevestigd door de knop “OK” te klikken.
- Ze kunnen als standaardinstellingen worden ingesteld door de knop “Stockeer” te klikken.
- Wijken de actuele instellingen af van de standaardinstellingen, dan kunnen ze opnieuw worden gelijkgesteld aan de standaardinstellingen door de knop “Haal op” te klikken.
- De knop “Annuleer” wijzigt de actuele instellingen niet.
Wanneer het programma beëindigd wordt, worden de standaardinstellingen bewaard. Bij het opstarten van het programma, worden de standaardinstellingen opgehaald en worden meteen de actuele instellingen.
Si vous souhaitez modifier les informations relatives aux étriers de la vue longitudinale, sélectionnez la commande “Format” – “Annotations” – “Etriers“. La fenêtre de dialogue illustrée apparaît alors à l’écran :
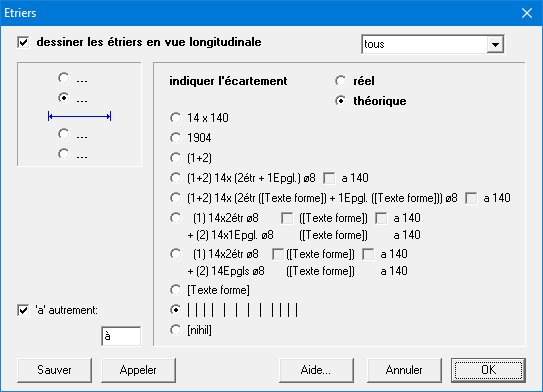
- Un bouton à cocher
 vous permet d’indiquer si vous souhaitez voir dessiner les étriers dans la vue longitudinale.
 - Dans le menu déroulant
 vous spécifiez le nombre d’étriers ConCrete Plus doit dessiner. Vous avez le choix entre :
- dessiner tous les étriers
- 1 par zone (au milieu de la zone)
- 2 par zone (un au début, un à la fin de la zone)
- 3 par zone (un au début, un au milieu et un à la fin de la zone)
- Dans le carré supérieur gauche, vous pouvez indiquer, à l’aide des quatre boutons d’option , la ligne de cote (par rapport à la ligne de cotation) sur laquelle vous souhaitez spécifier des informations.
- Les différentes possibilités pour ses informations sont affichées dans le grand rectangle de droite. Un changement de bouton d’option modifie l’information sur la ligne indiquée. Pour la définition de “[texte de forme]”, veuillez voir point 4.6
- Par écartement théorique, on entend la distance séparant les étriers, telle que calculée par ConCrete, c.-à-d. sans se préoccuper de savoir si la distance totale est effectivement un multiple des écartements. L’écartement réel est l’écartement obtenu en divisant la longueur sur laquelle l’écartement théorique est valable, par le nombre d’étriers.
- A l’aide de l’avant-dernier bouton d’option, vous pouvez dessiner des lignes verticales sur la ligne de cote souhaitée, de manière à indiquer la position horizontale des étriers.
La signification des boutons “OK“, “Sauver“, “Appeler” et “Annuler” est identique à celle des boutons de ConCrete.
- Les paramètres spécifiés sont confirmés comme paramètres actuels en cliquant sur le bouton “OK“.
- Ils peuvent être spécifiés en tant que paramètres standard en cliquant sur le bouton “Sauver“.
- Si les paramètres actuels s’écartent des paramètres standard, ils peuvent être à nouveau assimilés aux paramètres standard en cliquant sur le bouton “Appeler“.
- Le bouton “Annuler” permet de ne pas modifier les paramètres actuels.
Lorsque vous quittez le programme, les paramètres standard sont enregistrés. Lors du démarrage du programme, les paramètres standard sont appelés et deviennent immédiatement les paramètres actuels.
