When you open the wind generator ![]() and click on the button ‘Terrain parameters’, the following dialog appears:
and click on the button ‘Terrain parameters’, the following dialog appears:
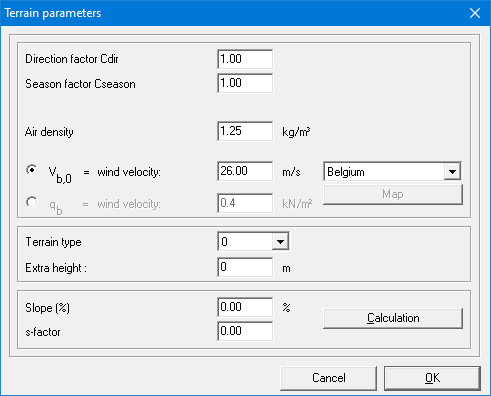
In the first part of this dialog, you either define
- the reference wind pressure qb (see EN 1991-1-4 §4.5)
- or the basic wind speed vb0 (see EN 1991-1-4 §4.2)
If you choose for this option, you’ll also have to define the direction cdir and season factor cseason. And the air density as well (usually = 1,25kg/m³). 1•2•Build will use these parameters to automatically calculate the reference wind pressure qb.
In the second part of this dialog, you must define the terrain type and (optionally) the additional height. Default, the additional height is set to 0m. But if the structure is located at a certain height above ground level, you need to specify this additional height. 1•2•Build will then automatically take the extra height into account while generating the wind loads.
The last part of this window is used to define a specific topographical location. To facilitate the use of the wind load generator, the slope percentage and the s-factor can be calculated automatically by clicking the ‘Calculation’ button. It is then sufficient to enter all coefficients in the dialog box that appears.
Wanneer u de windgenerator opstart ![]() en daarna op de knop ‘Terrein parameters’ klikt, verschijnt dit dialoogvenster:
en daarna op de knop ‘Terrein parameters’ klikt, verschijnt dit dialoogvenster:
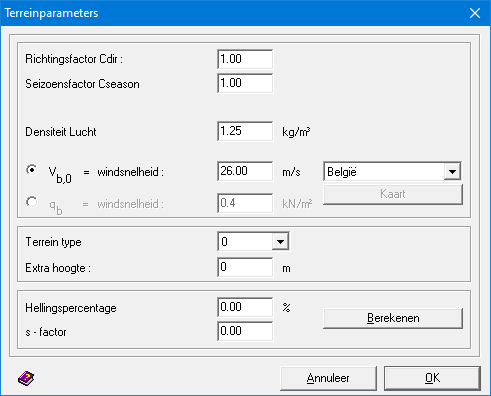
In het bovenste deel van dit venster, definieert u ofwel
- ofwel de referentie winddruk qb (zie EN 1991-1-4 §4.5)
- ofwel de basis wind snelheid vb0 (zie EN 1991-1-4 §4.2)
Indien u voor deze optie kiest, dient u ook de richtings- cdir en seizoensfactoren cseason op te geven (meestal = 1). Alsook de luchtdichtheid (meestal = 1,25kg/m³). 1•2•Build zal met deze gegevens dan automatisch de referentie winddruk qb .
In het tweede deel van dit venster moet u het terreintype opgeven en een extra hoogte (indien nodig).
Standaard staat deze extra hoogte op 0m. Maar als de structuur zich op een bepaalde hoogte boven het maaiveld bevindt, dan moet u deze extra hoogte opgeven. 1•2•Build zal dan automatisch de windlast toepassen rekening houdend met deze extra hoogte.
Het laatste deel van dit venster wordt gebruikt om een specifieke topografische ligging te definiëren. Om het gebruik van de windlastgenerator te vergemakkelijken, kan het hellingspercentage en de s-factor automatisch berekend worden door te klikken op de knop ‘Bereken’. Het volstaat dan om in het dialoogvenster dat verschijnt alle coëfficiënten in te geven.
Lorsque vous démarrez le générateur de vent ![]() et puis cliquez sur le bouton ‘Paramètres du terrain’, cette boîte de dialogue apparaît :
et puis cliquez sur le bouton ‘Paramètres du terrain’, cette boîte de dialogue apparaît :
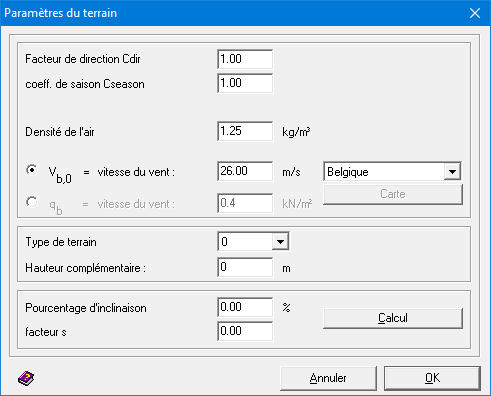
Dans la partie supérieure de cette fenêtre, vous définissez
- soit la pression du vent de référence qb (voyez EN 1991-1-4 §4.5)
- soit la vitesse de base du vent vb0 (voyez EN 1991-1-4 §4.2)
Si vous choisissez cette option, vous devez également spécifier les facteurs direction cdir et saison cseason (généralement = 1). Ainsi que la densité de l’air (généralement = 1,25 kg/m³). 1•2•Build calculera alors automatiquement la pression du vent de référence qb avec ces données.
Dans la deuxième partie de cette fenêtre, vous devez spécifier le type de terrain et une hauteur supplémentaire (si nécessaire). Par défaut, cette hauteur supplémentaire est définie sur 0 m. Si le cas que vous considérez se trouve à une hauteur supérieure, indiquez simplement la hauteur complémentaire à considérer. 1•2•Build appliquera automatiquement des vents en considérant la hauteur complémentaire.
La dernière partie de cette fenêtre permet de définir un emplacement topographique précis. Pour faciliter l’utilisation du générateur de charge de vent, le pourcentage de pente et le facteur peuvent être calculés automatiquement en cliquant sur le bouton ‘Calculer’. Il suffit alors de saisir tous les coefficients dans la boîte de dialogue qui apparaît.
