Calculating the value of a concentrated or distributed load can be simplified by using the load descent function. This function is called via the button ![]() , which is available in the dialogs for the definition of concentrated and distributed loads.
, which is available in the dialogs for the definition of concentrated and distributed loads.
Note: this feature is not available if you’re using a demo version of 1•2•Build. This feature is made available the moment you have a purchased license key.
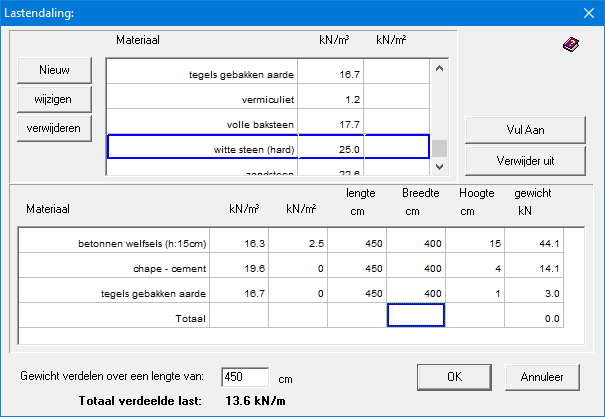
This will give you access to the following list of material properties:
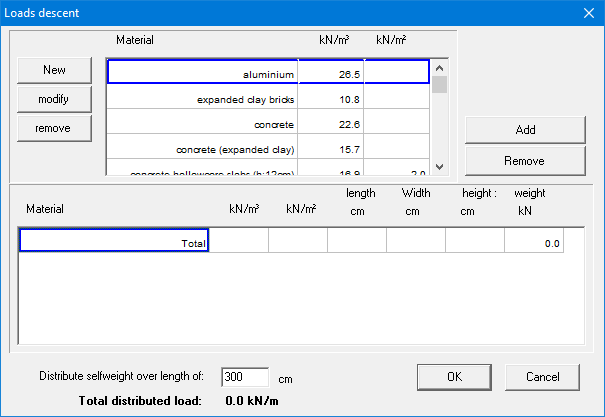
Double click the material you wish to add to the calculation frame. Or select the material and click on the button ![]() . You can delete a material that has already been included in the calculation frame by selecting it and then clicking the button
. You can delete a material that has already been included in the calculation frame by selecting it and then clicking the button ![]() .
.
Once you have included a material in the calculation frame, you must indicate over which surface (length and width) this material is applied. If necessary, a thickness must also be specified. Based on this, the total weight can be calculated that should eventually be transferred to the bars you selected earlier.
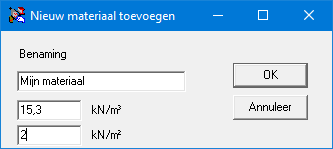
If a desired material is not available in the list, the user can add a new material using the button ![]() .
.
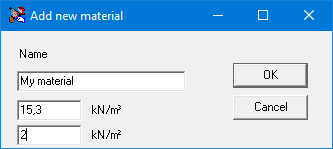
Click ‘OK’ the add the new material in the list. This also saves the completed list. The newly entered material is then selected so that it can be immediately added to the calculation frame.
If you use the load descent function to define a distributed load, you only need to enter the length over which the load is distributed. For convenience, 1•2•Build has already filled in the total span for you. If you had selected several spans simultaneously, 1•2•Build enters the length of the last span here. In that case, you must associate the column “Length” from the calculation frame with this span.
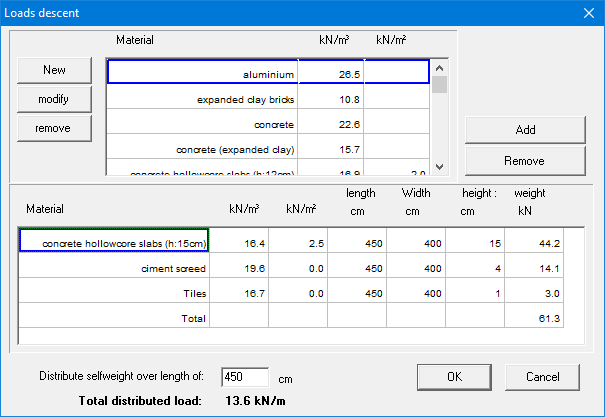
Confirm your definitions with ‘OK’, and the calculated load (either a distributed load or a concentrated load) appears automatically in the input fields of the load dialogs.
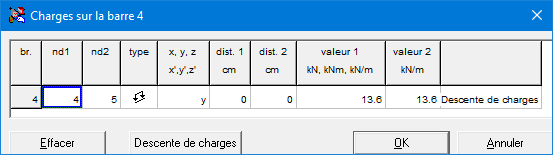
The composition of the load is stored with the relevant bar elements and can be included in a calculation note.
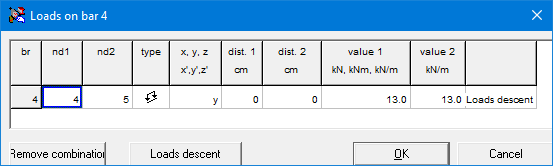
Once loads have been defined on a bar using the load descent function, changes can still be made. To do this, select the desired bar and double click to obtain an overview of the loads that have been applied to it.
In the overview that appears, you cannot directly adjust the values of the loads. However, via the button ![]() you regain access to the load descent function and adjust the existing definitions.
you regain access to the load descent function and adjust the existing definitions.
Het berekenen van de waarde van een puntlast of een verdeelde last kan men grotendeels vereenvoudigen door gebruik te maken van de lastendalingsfunctie. Die functie wordt opgeroepen via de knop ![]() , die beschikbaar is in de dialogen voor de definitie van puntlasten en verdeelde lasten.
, die beschikbaar is in de dialogen voor de definitie van puntlasten en verdeelde lasten.
Opmerking: deze functie is niet beschikbaar als u gebruik maakt van een demo-versie van 1•2•Build. Deze functie wordt beschikbaar gesteld op het ogenblik dat u over een aangekochte licentiesleutel beschikt.
Hierdoor krijgt u toegang tot de volgende lijst van materiaaleigenschappen:

Dubbelklik het materiaal dat u wenst toe te voegen aan het rekenkader. Of selecteer het materiaal en een klik op de knop . U kan een materiaal dat al werd opgenomen in het rekenkader verwijderen door het te selecteren en vervolgens op de knop te klikken.
Eenmaal u een materiaal hebt opgenomen in het rekenkader moet worden aangegeven over welk oppervlak (lengte en breedte) dit materiaal wordt toegepast. Eventueel moet ook een dikte worden opgegeven. Op basis hiervan kan het totaalgewicht worden berekend dat uiteindelijk moet worden overgedragen op de staven die u eerder selecteerde.
Vindt u het gewenst materiaal niet in de materialenlijst, dan kan u steeds een nieuw materiaal toevoegen via de knop .
Via ‘OK’ plaatst u het nieuwe materiaal in de lijst. Deze aangevulde lijst wordt automatisch bewaard. Het nieuwe materiaal wordt vervolgens geselecteerd zodat het onmiddellijk kan overgebracht worden naar het rekenkader.
Gebruikt u de lastendalingsfunctie om een verdeelde belasting te definiëren, dan rest u enkel nog de lengte in te vullen waarover de belasting verspreid wordt. Gemakshalve heeft 1•2•Build voor u de totale overspanning al ingevuld. Als u meerdere overspanningen gelijktijdig had geselecteerd, dan vult 1•2•Build hier de lengte in van de laatste overspanning. In dat geval moet u de kolom “Lengte” uit het rekenkader associëren met deze overspanning.
Bevestig nu uiteindelijk uw definities met ‘OK’, en de berekende last (hetzij een verdeelde last, hetzij een puntlast) verschijnt automatisch in de invoervelden van de lastendialogen.
De aldus opgebouwde samenstelling van de lastendaling wordt bewaard bij de betreffende staafelementen en kan mee worden opgenomen in een berekeningsnota.
Eenmaal lasten werden gedefinieerd op een staafelement aan de hand van de lastendalingsfunctie, kunnen uiteraard ook wijzigingen worden aangebracht. Selecteer daartoe de gewenste staaf en dubbelklik om een overzicht te bekomen van de lasten die op de staaf werden toegepast.
In het overzicht dat verschijnt, kan u de waarden van de lasten niet rechtstreeks aanpassen. Echter, via de knop ![]() , krijgt u opnieuw toegang tot de lastendalingsfunctie en kan u de bestaande definities aanpassen.
, krijgt u opnieuw toegang tot de lastendalingsfunctie en kan u de bestaande definities aanpassen.
1•2•Build est pourvu d’une fonction de descente de charges qui permettra une détermination rapide d’une charge définie par plusieurs matériaux. Cette descente de charges est accessible à partir de toutes les fenêtres de dialogue pour la définition des charges. Chacune de ces fenêtres est munie d’un bouton ‘Descente de charges’. Grâce à celui-ci, vous accédez directement à la descente de charges proposée par 1•2•Build.
Cette descente de charges consiste à définir une série de matériaux ayant chacun une valeur de poids propre bien définie. L’utilisateur devra définir la largeur, la hauteur et la longueur de façon à déterminer un volume pour calculer le poids à prendre en compte. L’avantage de cette descente de charges est de pouvoir définir plusieurs matériaux superposés. Imaginons par exemple un plancher. On peut supposer qu’il soit composé premièrement d’un hourdi avec une dalle de compression en béton. Ensuite, viendrait s’ajouter une chape puis un carrelage. Voici une illustration de la descente de charges générée par 1•2•Build pour cet exemple.
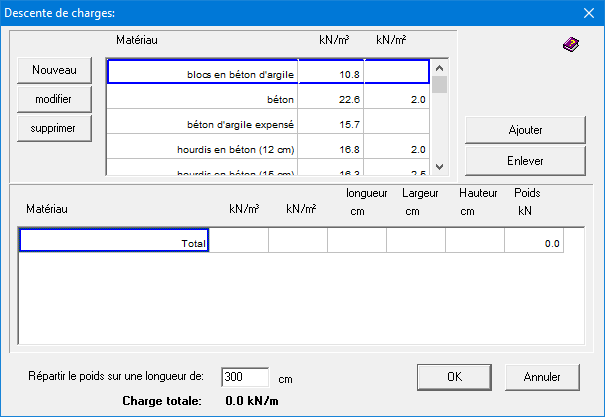
Cette fenêtre de dialogue propose une liste de matériau dans la première moitié. Cette liste est ouverte c’est-à-dire que l’utilisateur peut sans aucun problème y apporter ses modifications, ses ajouts,… Utilisez à cet effet les boutons en haut à gauche. Par exemple, en cliquant sur ![]() , voici ce que vous obtenez.
, voici ce que vous obtenez.

La deuxième moitié contient un tableau du ou des matériaux choisis. Pour les insérer, on utilise le bouton ![]() en haut à droite après avoir sélectionné le matériau adéquat dans la liste supérieure. De même, pour supprimer, utilisez le bouton
en haut à droite après avoir sélectionné le matériau adéquat dans la liste supérieure. De même, pour supprimer, utilisez le bouton ![]() après avoir sélectionné le matériau dans la liste inférieure.
après avoir sélectionné le matériau dans la liste inférieure.
Une fois que vous avez placé le ou les matériaux dans la liste du bas, vous pouvez compléter la largeur, la longueur et parfois la hauteur (en fonction du matériau choisi). 1•2•Build détermine ainsi le volume et le poids correspondant. Il fait la somme pour l’indiquer dans la ligne ‘Total’.
Finalement, il faut dire sur quelle longueur cette charge doit être répartie. Par défaut, vous trouverez la longueur de l’élément sélectionné dans l’éditeur tout en bas de la fenêtre. Toutefois, vous pouvez modifier la valeur dans l’éditeur.
Juste en dessous de l’éditeur vous avez alors la charge totale par mètre courant. C’est cette valeur qu’il va utiliser.
Une fois que la charge a été créée, vous pouvez toujours la modifier en double-cliquant sur la barre. Une fenêtre de dialogue apparaît avec la liste des charges. Si la charge provient d’une descente de charges, elle est bien répertoriée comme telle et un bouton s’active dans le bas de la fenêtre pour apporter les modifications éventuelles.