With the button ![]() you can design elements in steel. The following dialog appears:
you can design elements in steel. The following dialog appears:
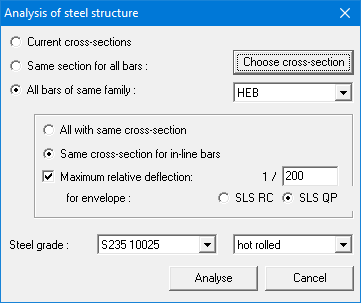
- During the first design, it’s best to use the option ‘All bars of same family’ and select the relevant family from the pull down list. By doing this, 1•2•Build is free to choose the most optimal cross-section within the selected family.
- The dialog also allows you to define the maximum allowed relative deflection, based on an SLS RC or QP envelope combination. If no cross-section can be found that is sufficient, 1•2•Build will give a warning.
You can deviate anytime from the proposal that 1•2•Build has made. You can, for example:
- Select the relevant bar(s).
- Restart the design by clicking on
 .
. - Select the option ‘Same section for all bars’ and click on the button ‘Choose cross section’. You’ll get access to the library below:
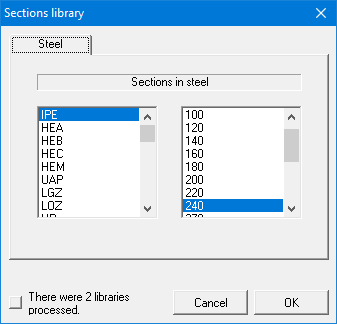
- In the first column you select the family of the cross-section and in the second column the relevant cross-section.
- Hit ‘OK’. 1•2•Build will perform the design again for the cross-section you’ve chosen.
Note: your choice of cross-sections will only be applied to the bars you selected before starting the design! For all bars that were NOT selected, the previous cross-section choice will be maintained.
Om een structuur te dimensioneren in staal, gebruikt u de knop ![]() . Hierdoor krijgt u toegang tot volgende dialoog:
. Hierdoor krijgt u toegang tot volgende dialoog:
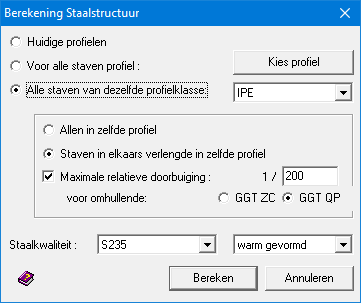
- Bij een eerste dimensionering, gebruikt u best de optie “Alle staven van dezelfde profielklasse” en selecteert u de gewenst profielklasse uit de pull-down lijst. Hierdoor zal 1•2•Build binnen de geselecteerde profielklasse de meest optimale doorsnede bepalen.
- In dit dialoogvenster kan u ook de maximale relatieve doorbuiging definiëren. Dit kan op basis van de zeldzame of quasi-permanente combinatie. Indien de huidige afmetingen niet voldoen, toont 1•2•Build een waarschuwing.
U kan op elk moment afwijken van het voorstel dat 1•2•Build doet. Om dat te doen, gaat u als volgt te werk:
- Selecteer de relevante staaf/ staven.
- Start de dimensionering opnieuw via de knop .
- Selecteer de optie ‘Voor alle staven profiel’ en klik daarna op de knop ‘Kies profiel’. U krijgt toegang tot onderstaande bibliotheek:
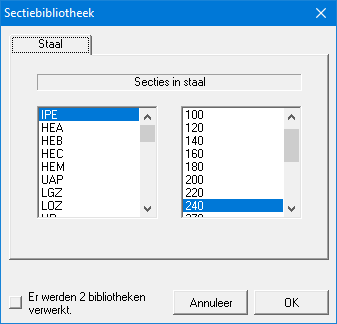
- In de eerste kolom kiest u de profielklasse waarin u een profiel wenst te selecteren. In de tweede kolom worden dan alle profielen voorgesteld die tot deze profielklasse behoren.
- Klik op ‘OK’. 1•2•Build zal de dimensionering opnieuw uitvoeren met het profiel naar uw keuze.
Opmerking: deze profielkeuze zal enkel worden toegepast voor die staven die u selecteerde voor het opstarten van de dimensionering! Voor alle staven die NIET werden geselecteerd, wordt de voorgaande profielkeuze behouden.
En utilisant le bouton ![]() vous démarrez le dimensionnement en acier. Cela vous donnera accès à la boîte de dialogue suivante:
vous démarrez le dimensionnement en acier. Cela vous donnera accès à la boîte de dialogue suivante:
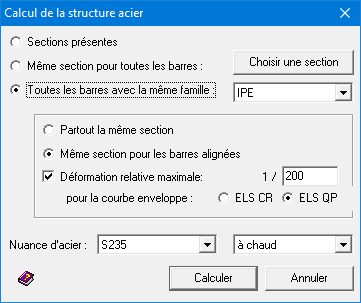
- Pour un premier dimensionnement, il est préférable d’utiliser l’option ‘Tous les barres de la même famille’ et de sélectionner la famille souhaitée dans la liste déroulante. En conséquence, 1•2•Build déterminera la section la plus optimale dans la famille sélectionnée.
- Dans cette boîte de dialogue, vous pouvez également définir la déflexion relative maximale. Cela peut être basé sur la combinaison rare ou quasi-permanente. Si les dimensions actuelles ne répondent pas aux exigences, 1•2•Build affichera un message.
Vous pouvez aussi choisir une section. Pour ce faire:
- Sélectionnez-le(s) barres concernées.
- Redémarrez le dimensionnement avec le bouton .
- Sélectionnez l’option ‘Même section pour toutes les barres’ et puis sur le bouton ‘Choisir une section’. Vous aurez accès à la bibliothèque ci-dessous :
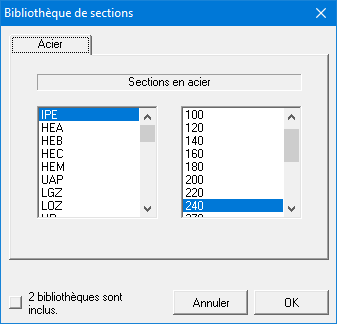
- Dans la première colonne, sélectionnez la famille. Tous les profils appartenant à cette famille seront alors présentés dans la seconde colonne.
- Cliquez sur ‘OK’. 1•2•Build refaites le dimensionnement avec le profil de votre choix.
Remarque : ce choix de profil ne s’appliquera qu’aux barres que vous avez sélectionnées avant de commencer le dimensionnement ! Pour tous les barres NON sélectionnées, le choix de profil précédent est conservé.
