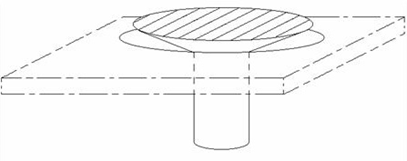
1. What is punching?
Punching is the failure of a plate submitted to a concentrated load. The element causing the load is punched through the plate.
The failure surface is conical (= punching cone) . The element that causes the concentrated load on the plate does not shoot through paper like a hole punch.
 |
 |
2. How to calculate the punching shear reinforcement
2.1 In case of a footing 
- The punching shear reinforcement is automatically calculated in the general reinforcement design
 .
.
2.2 In all other cases
- Calculate the reinforcement or F2.
- Go to the reinforcement results
 and activate the button for the punching reinforcement
  .
. - First select the point, then select all surrounding plates.
If you select the surrounding plates first, it becomes hard to see if the point is selected or not.
You have to select all surrounding plates, because otherwise Diamonds can think you’re calculating an edge column instead of a center column (will affect β). - Click once with the right mouse button. The dialog below opens.
The manual explains in detail what the meaning is of all the parameters.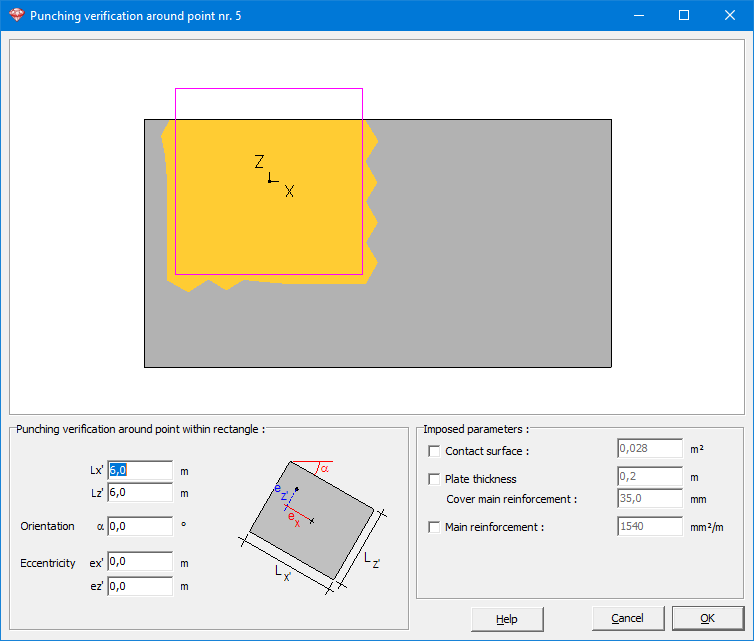
- Click ‘OK’ to start the calculations.

3. Interpretation of the results
Let’s say you need punching shear reinforcement and this is the result Diamonds gives you.

Option 1 (easy but conservative)
- The area in which punching shear reinforcement is required is within the pink circle.
Using the mouse and the distances at the bottom of the screen, you can determine the diameter of this area.

- Assume that in the entire pink zone, 826mm²/m² is required.
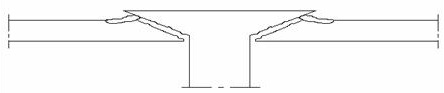
- Both radial and orthogonal lay-out patterns for the punching shear reinforcement are possible, but let’s go with this radial pattern (source image: Max Frank).

- Using the diameter of the pattern (orange line) determine the area
 of the pattern (m²).
Determine the area (mm²) of one vertical rod (red line) .
.
The number of rods multiplied by, divided by , gives the mount of punching shear reinforcement per square meter in the chosen reinforcement pattern.
![\[\frac{\text{No. rods} \cdot a}{A} \]](https://support.buildsoft.eu/wp-content/ql-cache/quicklatex.com-d9a963981e094e2057dfef8353bd2d40_l3.png "Rendered by QuickLaTeX.com")
This value must be larger than the 826mm²/m² calculated by Diamonds and must be placed all over the pink zone.
Option 2 (more work but more economic design)
- You can destinguish 2 zones in this model:
- White zone with radius
 and required punching shear reinforcement of 826mm²/m².
 - Pink zone (donut shaped – outer radius
 , inner radius ) and required (mean) puching shear reinforcement of 500mm²/m².
Using the mouse and the distances at the bottom of the screen, you can determine radius of these zones.

- White zone with radius
- Assume a radial reinforcement pattern again.
- Calculate the area
 (m²) of the white zone using .
Determine the area (mm²) of one vertical rod (red line).
The number of rods in the WHITE AREA multiplied by, divided by , gives the mount of punching shear reinforcement per square meter in the white zone.
![\[\frac{\text{No.of.rods} \cdot a}{A_1} \]](https://support.buildsoft.eu/wp-content/ql-cache/quicklatex.com-cfc44f33626c75994f7c54155b2a1cec_l3.png "Rendered by QuickLaTeX.com")
This value must be larger than the 826mm²/m² calculated by Diamonds and must be placed all over the white zone.
- Calculate the area (m²) of the donut zone (
 ).
).
Determine the area of one vertical rod (red line) a (mm²).
The number of rods in the DONUT zone multiplied by, divided by , gives the mount of punching shear reinforcement per square meter in the donut zone.
![\[\frac{\text{No.of.rods} \cdot a}{A_2-A_1} \]](https://support.buildsoft.eu/wp-content/ql-cache/quicklatex.com-5546a9282a5d24478eea20138d76392a_l3.png "Rendered by QuickLaTeX.com")
This value must be larger than the 500mm²/m² calculated by Diamonds and must be placed all over the donut zone.
