Before we get started
- A model can contain multiple soil layer profiles.
Also read: How many soil layer profiles can be taken into account? - Soil layers can be applied under a beam, a slab or a plate.
Soil layers are not designed to be applied to walls. - The article below explains how you can add soil layers one by one in Diamonds, but you can also import an entire soil layer profile.
How to assign a soil layer profile?
- Select the beams/ plates under which you want to apply soil layers and click on
 .
. - With the Y-displacement, choose for Soil layers and click on
 .
. - Then, click on
 and enter the general settings:
- Choose between a CTP (often used in Belgium/ the Netherlands) or Ménard test (used in France).
- Enter the position of the water level below the original ground level. This position is used to determine if Diamonds should calculate the soil stresses using the wet or dry density of soil. You should define any water and/or soil pressures manually as a load!
- Select if the bottom layer should be extended to infinity. This option is checked by default because it results in a conservative value for the settlement.
- Click on to add a new soil layer.
Enter the properties of one soil layer (see below).
If you have foundation slabs on different levels (Y-coordinate), you enter the soil layers starting from the ground level. - Add as many soil layers as necessary.
- Hit OK to close all the dialogs.
- Click on
 to run the elastic analysis.
In the tab page Soil, set the reference load group/ combination to an SLS combination.A table with soil layers is not suitable for FEM-calculations. So the soil layers are translated into functions. Each mesh node in the foundation, will have its function depending on the loads present in that mesh node… That’s why you have to choose a reference combination
The loads in the reference combination will determine the behaviour of the soil function.
Soil functions in Diamonds, can only be trained to do one thing: either understand how compressed soil works or either understand how soil under tension works.
By consequence: if you need the settlement in combinations that contains mainely vertical downward loads, you should take a reference combination that contains mainely vertical loads.If your model also contains combinations that mainely consist of vertical upward loads (water pressure) then you should redo the calculation a second time, using a reference combination that also contains mainely vertical upward loads.
If you try to calculate a combination that consists mainely of vertical upwards loads, with a reference combinations that contains mainely vertical downward loads, that can lead to iteration problems.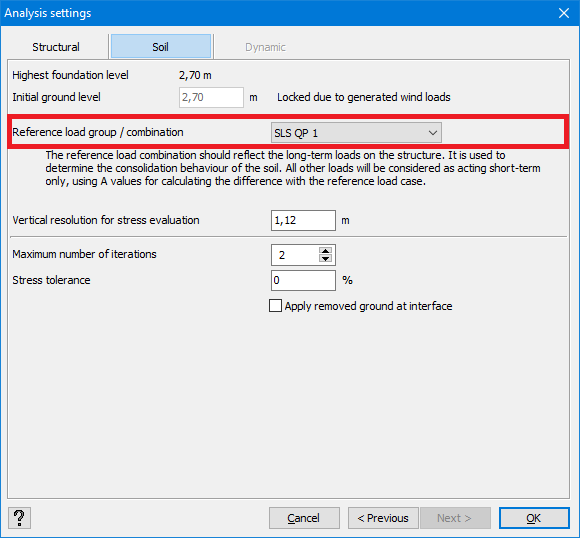
- The layer thickness
- The compressibility constant C is usually given in the report of the CPT-test.
Otherwise it can be calculated from:![\[C = \frac{\alpha \cdot q_c}{\sigma'_{v.0}}\]](https://support.buildsoft.eu/wp-content/ql-cache/quicklatex.com-a0e696ea64e997b011464cd935c59a96_l3.png "Rendered by QuickLaTeX.com")
With
 the conical resistance
 the granulometric tension at the depth
 correlationfactor (see EN 1997-1-2 Table D.2)
- The recompressibility constant A can be calculated using C depending on the soil type
(source: Afleiden van de samendrukbaarheid uit in-situ proeven’ – KVIV-TI)- Sand: A = 8 to 10 x C
- Loam: A = 4 to 5 x C
- Clay: A = 3 x C
- Peat: A = C
- The drainage ratio CC [%]
This value is a measure for how much of the consolidation (relaxation) has occurred between the moment of excavation and (re)loading.
- CC = 0%
Excavation and loading by the foundation happen quickly one after the other. There is no soil relaxation possible. At foundation level, the soil stress is equal to the original geostatic stress. - CC = 100% (default value)
There is a long time between the excavation and loading by the foundation, causing all preconsolidation to fade out. At foundation level, the soil stress is equal to 0 kN/m, and it will act like the natural ground surface.
This results in larger settlements (more conservatice) than CC=0%. More info here.
CC does not only depend on the time between excavation and loading, but also on the soil type, in the particular the drain capacity. The more easy it is for a soil to drain the pore water, the faster the soil will relax and the preconsolidation will be gone.
- For a foundation pit that is being drained, CC will be 100%.
- Sand drains well, so CC will be approximately 100%.
- Thin top layers of clay will drain quite quickly, so CC will between 50 and 75%.
- Thick lower layers of clay will drain rather slow, so CC will be between 25 and 50%.
- Thick deep layers of clay will drain slow, so CC will be between 0 and 25%.
In practice 0% and 100% are used the most often.
- CC = 0%
- The overconsolidation ratio OCR takes préloading, different from an excavation, into account. For example: an old building will be demolished before building a new one. Or a large pile of soil (above the ground level) will be removed before construction starts.
The old building and the pile of soil are a preloading of the soil which cannot be considered as an excavation. You’ll need to increase the OCR-value for that.
This test is conducted with the help of an expanding cylinder. It is either directly situated in a pre-drilled hole, or brought to a proper depth by autoforage, sinking, vibration or any other suitable procedure. The measurements of the ground deformations based on the pressures put on the probing head allow you to make a chart of deformations in terms of exerted forces and to deduce the mechanical characteristics of the soil.
The pressuremetric compression modulus EMK determined this way at different depths is perfectly analogous to the compression constant C. The settlements are determined by Terzaghi’s law but with the use of the following equation:
![\[s(i)=\sum \frac{\alpha _{k}\cdot \Delta h}{E_{MK}}\cdot \Delta \sigma _{z}(i)\]](https://support.buildsoft.eu/wp-content/ql-cache/quicklatex.com-ed8de20aafb5152b5a594130cea4d604_l3.png "Rendered by QuickLaTeX.com")
In this formula, Δσz(i) corresponds to the vertical tension resulting from upper loads and observed at point i situated at depth z. Δh corresponds to the thickness of a layer of the soil in question.
The coefficient αk depends on the nature of the soil and can be taken from the table below:
| Nature of the soil | Peat | Clay | Lime | Sand | Gravel |
| Very compacted | – | 1 | 2/3 | 1/2 | 1/3 |
| Normally compacted | 1 | 2/3 | 1/2 | 1/3 | 1/4 |
| Non-compacted | – | 1/2 | 1/2 | 1/3 | 1/4 |
